Though not mandatory, moving to a custom domain can be viewed as an important move in your blogging journey. Most brands, if not all regard bloggers with custom domains with more importance than the ones having their blogs hosted on a free space
Having taken the plunge myself a few months back to get a new domain(if you’re reading this you probably know my domain name already from the address bar 🙂 , I feel its one of the most ideal step towards pursuing blogging quite seriously. So here are some easy steps in migrating from Blogspot/Wordpress to a custom domain of your own
For Blogspot.com Users
Step 1 : Purchasing a domain
A domain usually ranges from Rs.600-800 a year (you get the first year for 99rs if you buy for 2 years or more ). You need to keep renewing post that every year once.
Generally “.in” ,”.org”,”.biz”,”.co.in” are the cheapest at 99 for first year and 600-700 for 2nd year onwards. “.Com” is generally expensive, thanks to their wider reach and will cost you around 250-300 for first year and 700-800 ( from 2nd year onwards)
Blogspot.com users gets free hosting space by Google and hence there’s no requirement for buying separately a hosting
Most popular sites for purchasing a domain include : Hostgator, Godaddy.com, BigRock.in, Bluehost.in etc (Ideal to choose an India based company so that you have an Indian number for a call centre).
The domain could be under your own name or any fancy website that you always desired
Step 2 : Entering IP address in Domain Server
Once the domain is bought most of your work is almost complete. The below steps are just to map the domain with the blog and add the server IP to the domain name server
1. Go to www.blogger.com and click on Basics under the Settings tab.
2. In the “Publishing” section, click the link to “add a custom domain”

3. Type the url of the domain you’ve purchased, keeping in mind that it must begin with www in order to work.(eg. www.mywebsite.in). Click Save.
4. You should see an error, and two CNAMEs listed below (note these down separately)
Each CNAME is composed of two parts – Name, Label or Host and Destination, Target or Points To .
5. Login to Godaddy.com or your respective domain registrar’s website and locate the DNS (Domain Name System) settings in the control panel . You’ll find it under settings – > Manage Domain. Click on your domain name and do the following :

6.a) In the first CNAME box type the following Name = “www” and Points to = “ghs.google.com”like shown below
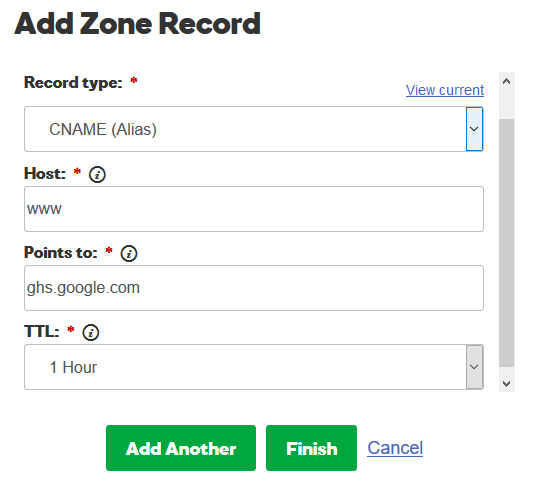
.
6.b) Once you finish adding the first CNAME , click on Add Another button .
The second CNAME is particular to your blog and your Google Account, and is therefore different for each person. (Copy paste it from your Blogger.com settings from Step 4)
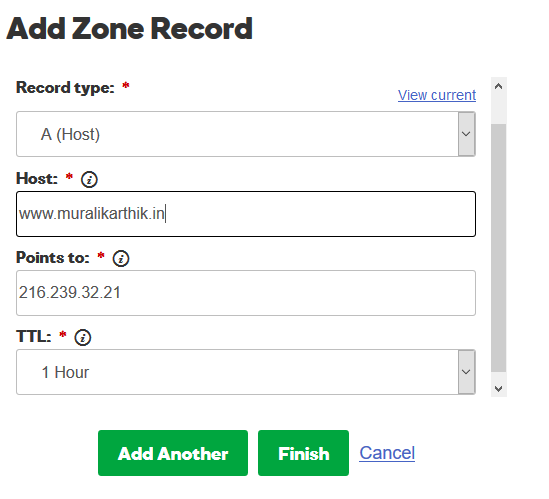
7 ) Click on Add Another and select A- Records ( This step is required so that people can open your website even if they do not mention a “www” before your domain name ). In Host Box, enter your domain name and in “Points To” box, enter : 216.239.32.21
Note : You need to repeat Step-7, 4 times to create totally 4 A-Records for the same IP Address
8. After your settings have been activated, you need to make sure Blogger knows about your custom domain so that Google can direct readers to your blog. Just head back to Blogger and update the information on your Settings | Basic tab. Find the area for “Publishing,” and click the link to add a custom domain.

For WordPress Users
Step 1 : Purchasing a Domain and Hosting space
Unfortunately WordPress does not allow for free hosting, if you are migrating to a custom domain on your own. They will either expect you to purchase a hosting option from WordPress.com itself or from a different vendor outside. This according to me is the biggest downside for a wordpress user and actually came as a bit of shocker. However several companies are offering a free domain when you a buy a WordPress hosting space.
So instead of buying a domain , get a hosting plan and you’ll get a free “.com” domain along with it.
Hosting Companies and Charges
The cheapest options would include BaseZap which comes to around 170/month (2.5$ a month) in addition to the domain name charges of around 600/year mentioned above
Highly Recommended Hosting Providers
Here’s a list of response/uptime/sites/HRank of all providers for WordPress Hosting Space.
Domain Charges
A domain usually ranges from Rs.600-800 a year (you get the first year for 99rs if you buy for 2 years or more ). You need to keep renewing post that every year once.
Generally “.in” ,”.org”,”.biz”,”.co.in” are the cheapest at 99 for first year and 600-700 for 2nd year onwards. “.Com” is generally expensive, thanks to their wider reach and will cost you around 250-300 for first year and 700-800 ( from 2nd year onwards)
Step 2 : Exporting and Downloading Existing WordPress Blog Data
- Log in to your WordPress dashboard. For example,
http://myblog.com/wp-admin, where myblog.com is your domain name. - Click Tools, and then select Export.
- Click Download Export File. This saves an XML file to your computer— the file name looks like
wordpress.date.xml. - Log out of the WordPress dashboard.
- Connect to your existing hosting account using File Transfer Protocol (FTP).
- Download the
wp-contentfolder to your computer.
Step 3 : Exporting and Downloading Existing WordPress Blog Data
To import and upload your personal WordPress blog to our servers, you need to access the new hosting server and WordPress administrator dashboard.
- Connect to your new hosting account using File Transfer Protocol (FTP)
- Upload the previously-exported folder (myblog.com, in our earlier example) and replace the contents of the existing
wp-contentfolder in your new hosting account. - Log in to your new WordPress dashboard. For example,
http://myblog.com/wp-admin where myblog.com is your domain name. - Click Appearance, and then select Theme.
- Select the theme you want, and then click Activate.
- Click Tools, and then select Import.
- Click WordPress, click Browse to locate the previously saved XML file on your computer, and click OK.
- Click Upload file and import.
- Click Submit.
Thank you so much. I just moved to a custom domain and this helped me a lot.